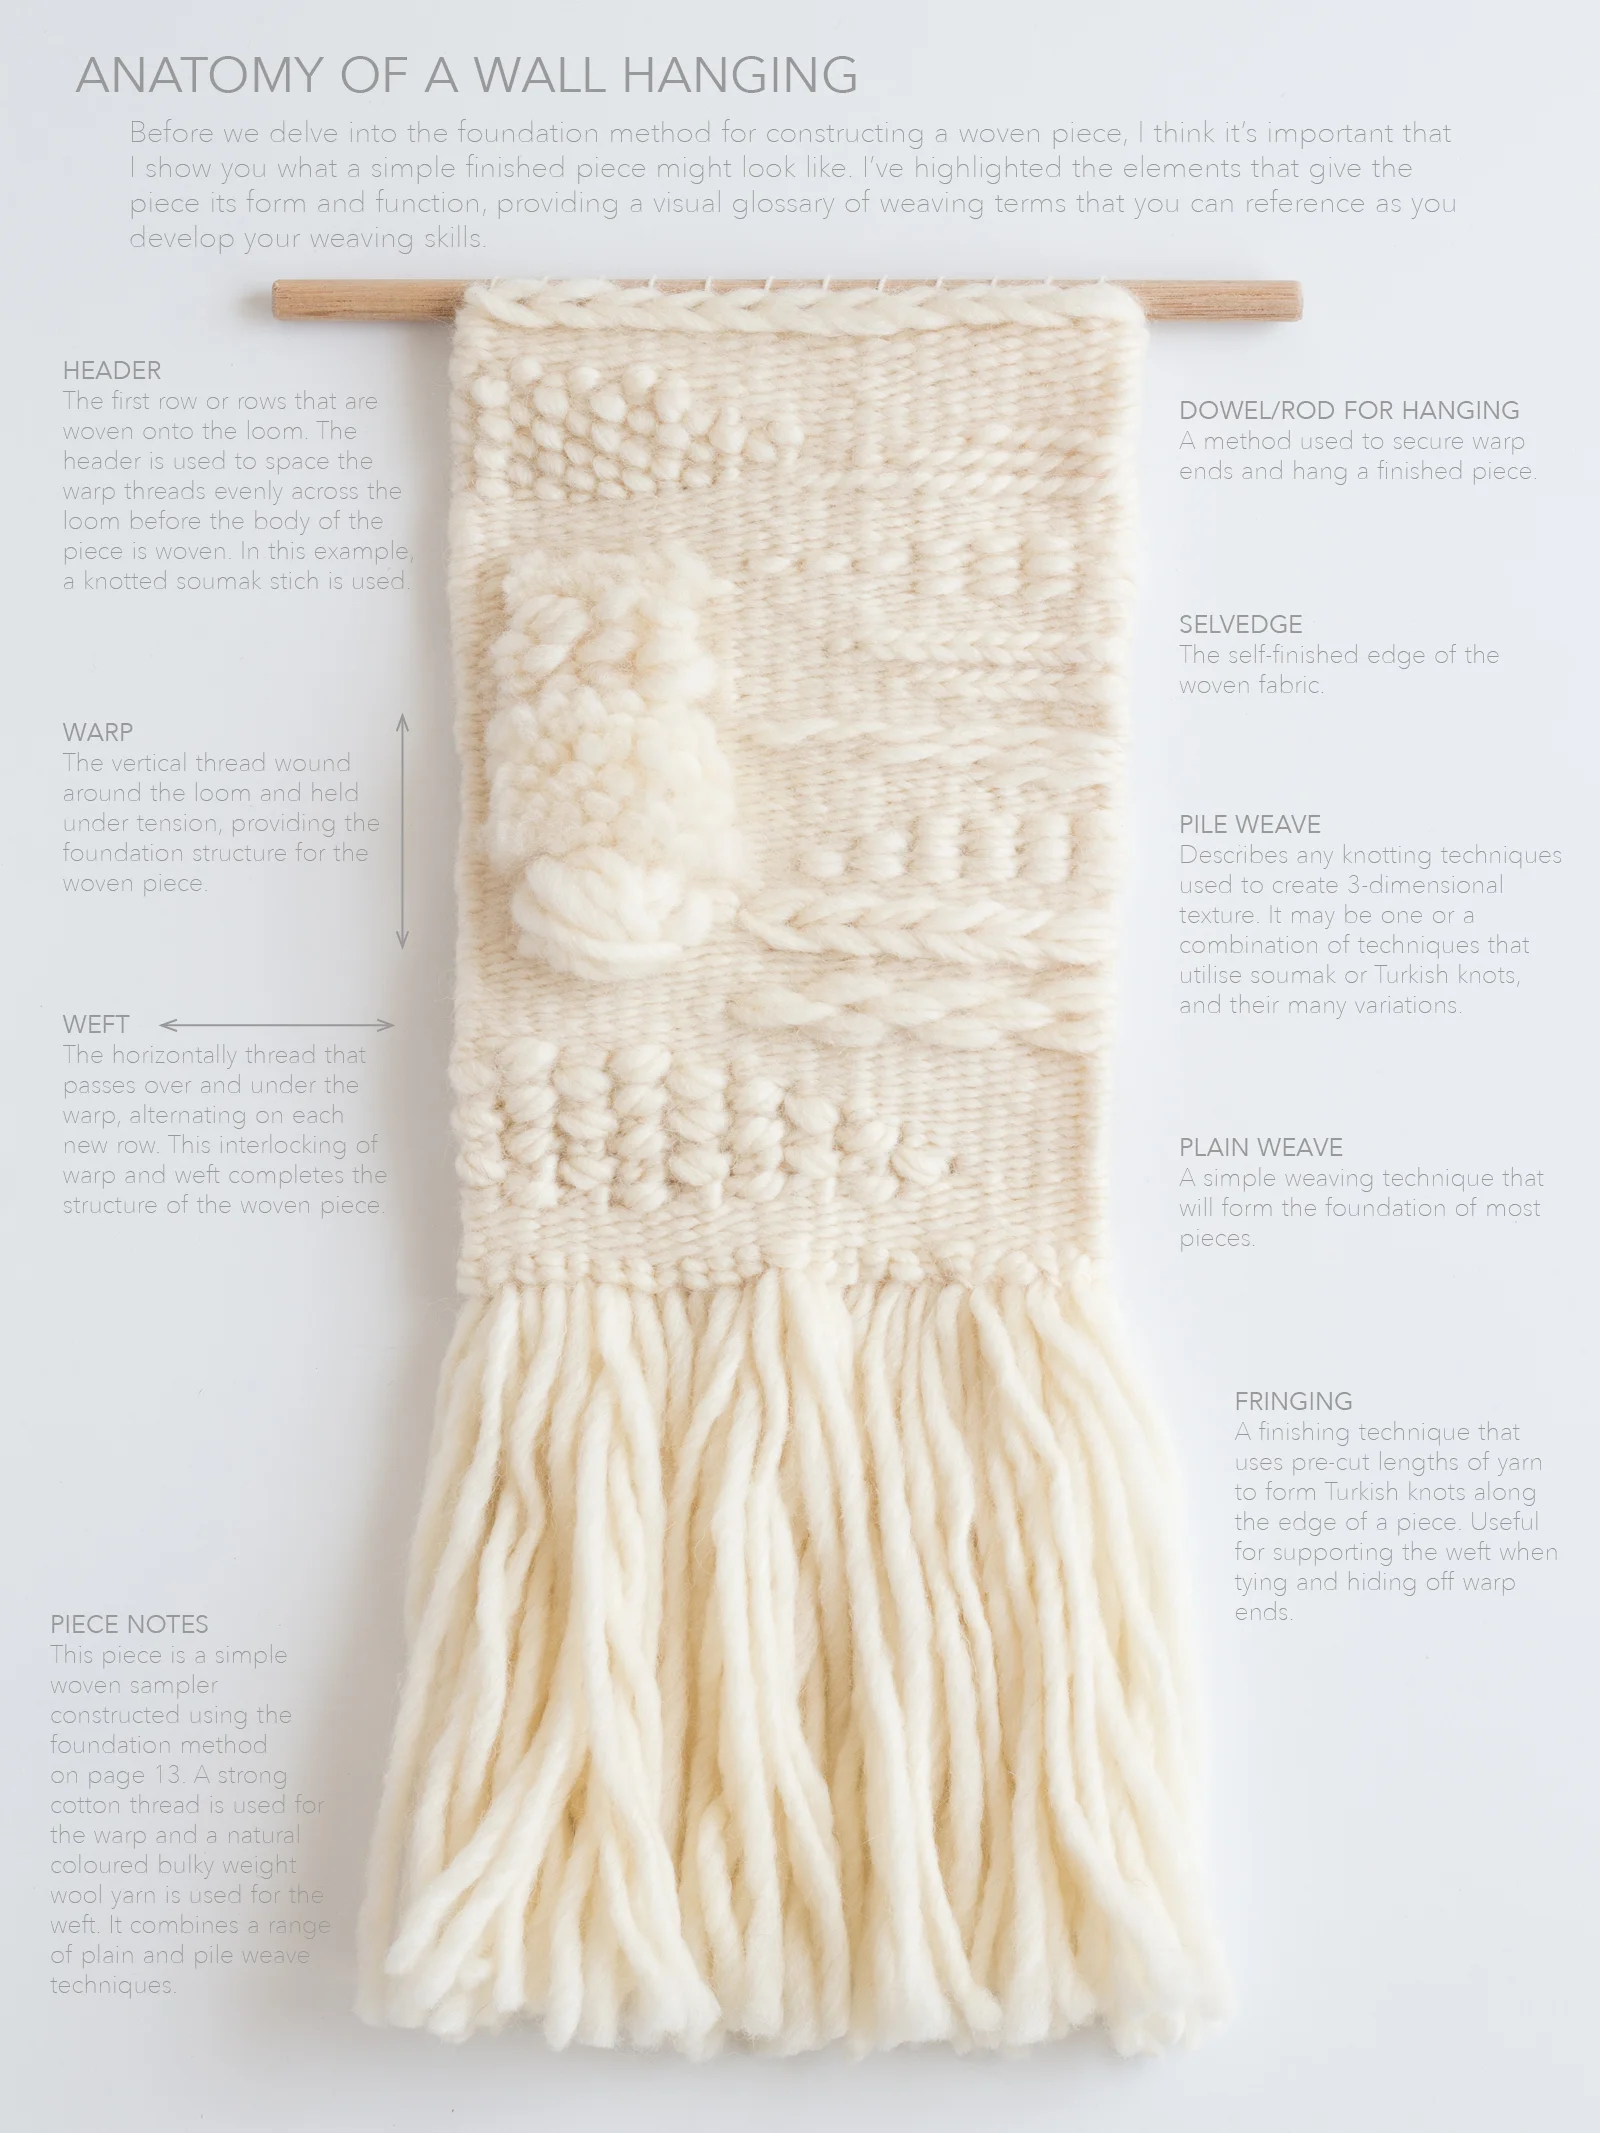


Upon its release last year we were instantly drawn to Andrea Mowry’s The Throwback - a top-down knit cardigan with cool retro-inspired colourwork detail around the yoke.
We thought the unique woolly texture and warming heathered shades of Loch Lomond GOTS would be a perfect match, so we got swatching.
Translating and working Mowry’s design into a swatch was easy enough until we hit the three-colour colourwork... worked flat!
Though we had some initial hesitation, we were up for the challenge.
We’ve detailed our swatch notes below, including a little trick we found for controlling that third unruly yarn.
Enjoy!
PROJECT
Swatching The Throwback by Andrea Mowry in Loch Lomond GOTS by BC Garn

AIM
To explore:
The fabric’s hand-feel at the resulting gauge
The suitability of Loch Lomond GOTS for colourwork, and
A method for working three-colour colourwork
SKILLS
Casting on
Casting off
Knitting flat
Reading charts for colourwork
Familiarity with different knitting styles:
Continental (yarn held in left hand)
English (yarn held in right hand)
TOOLS
4 mm (US 6) circular needles (we used Chiaogoo Spin Bamboo Interchangeables)
MATERIALS


BC Garn
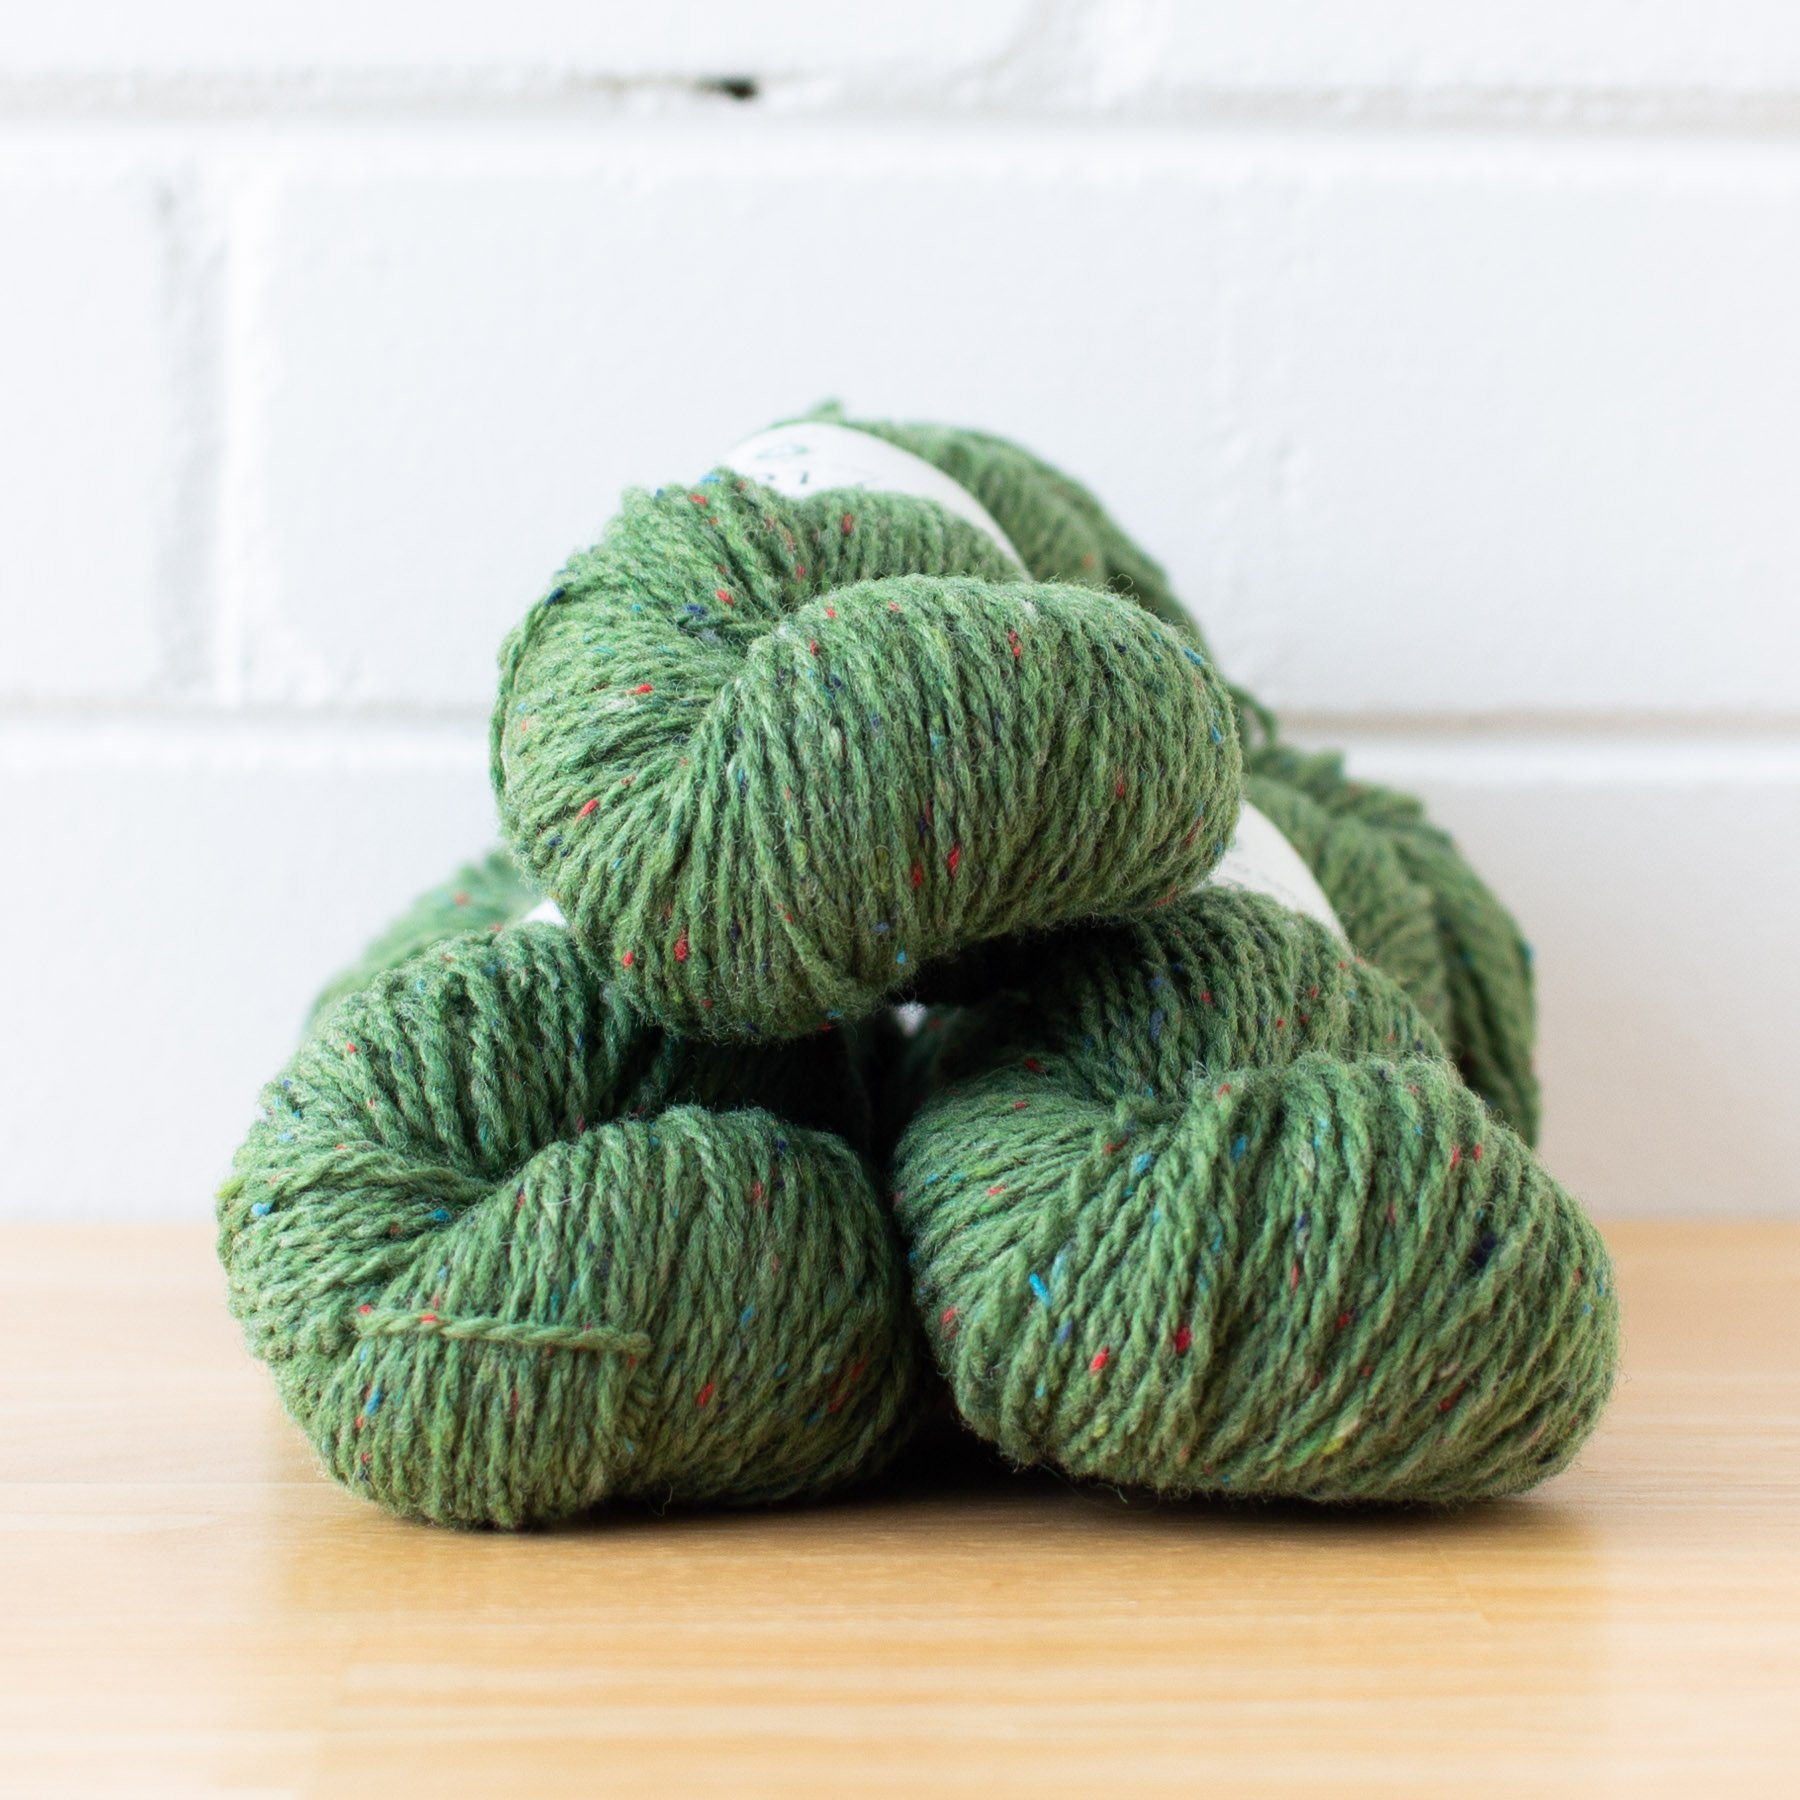
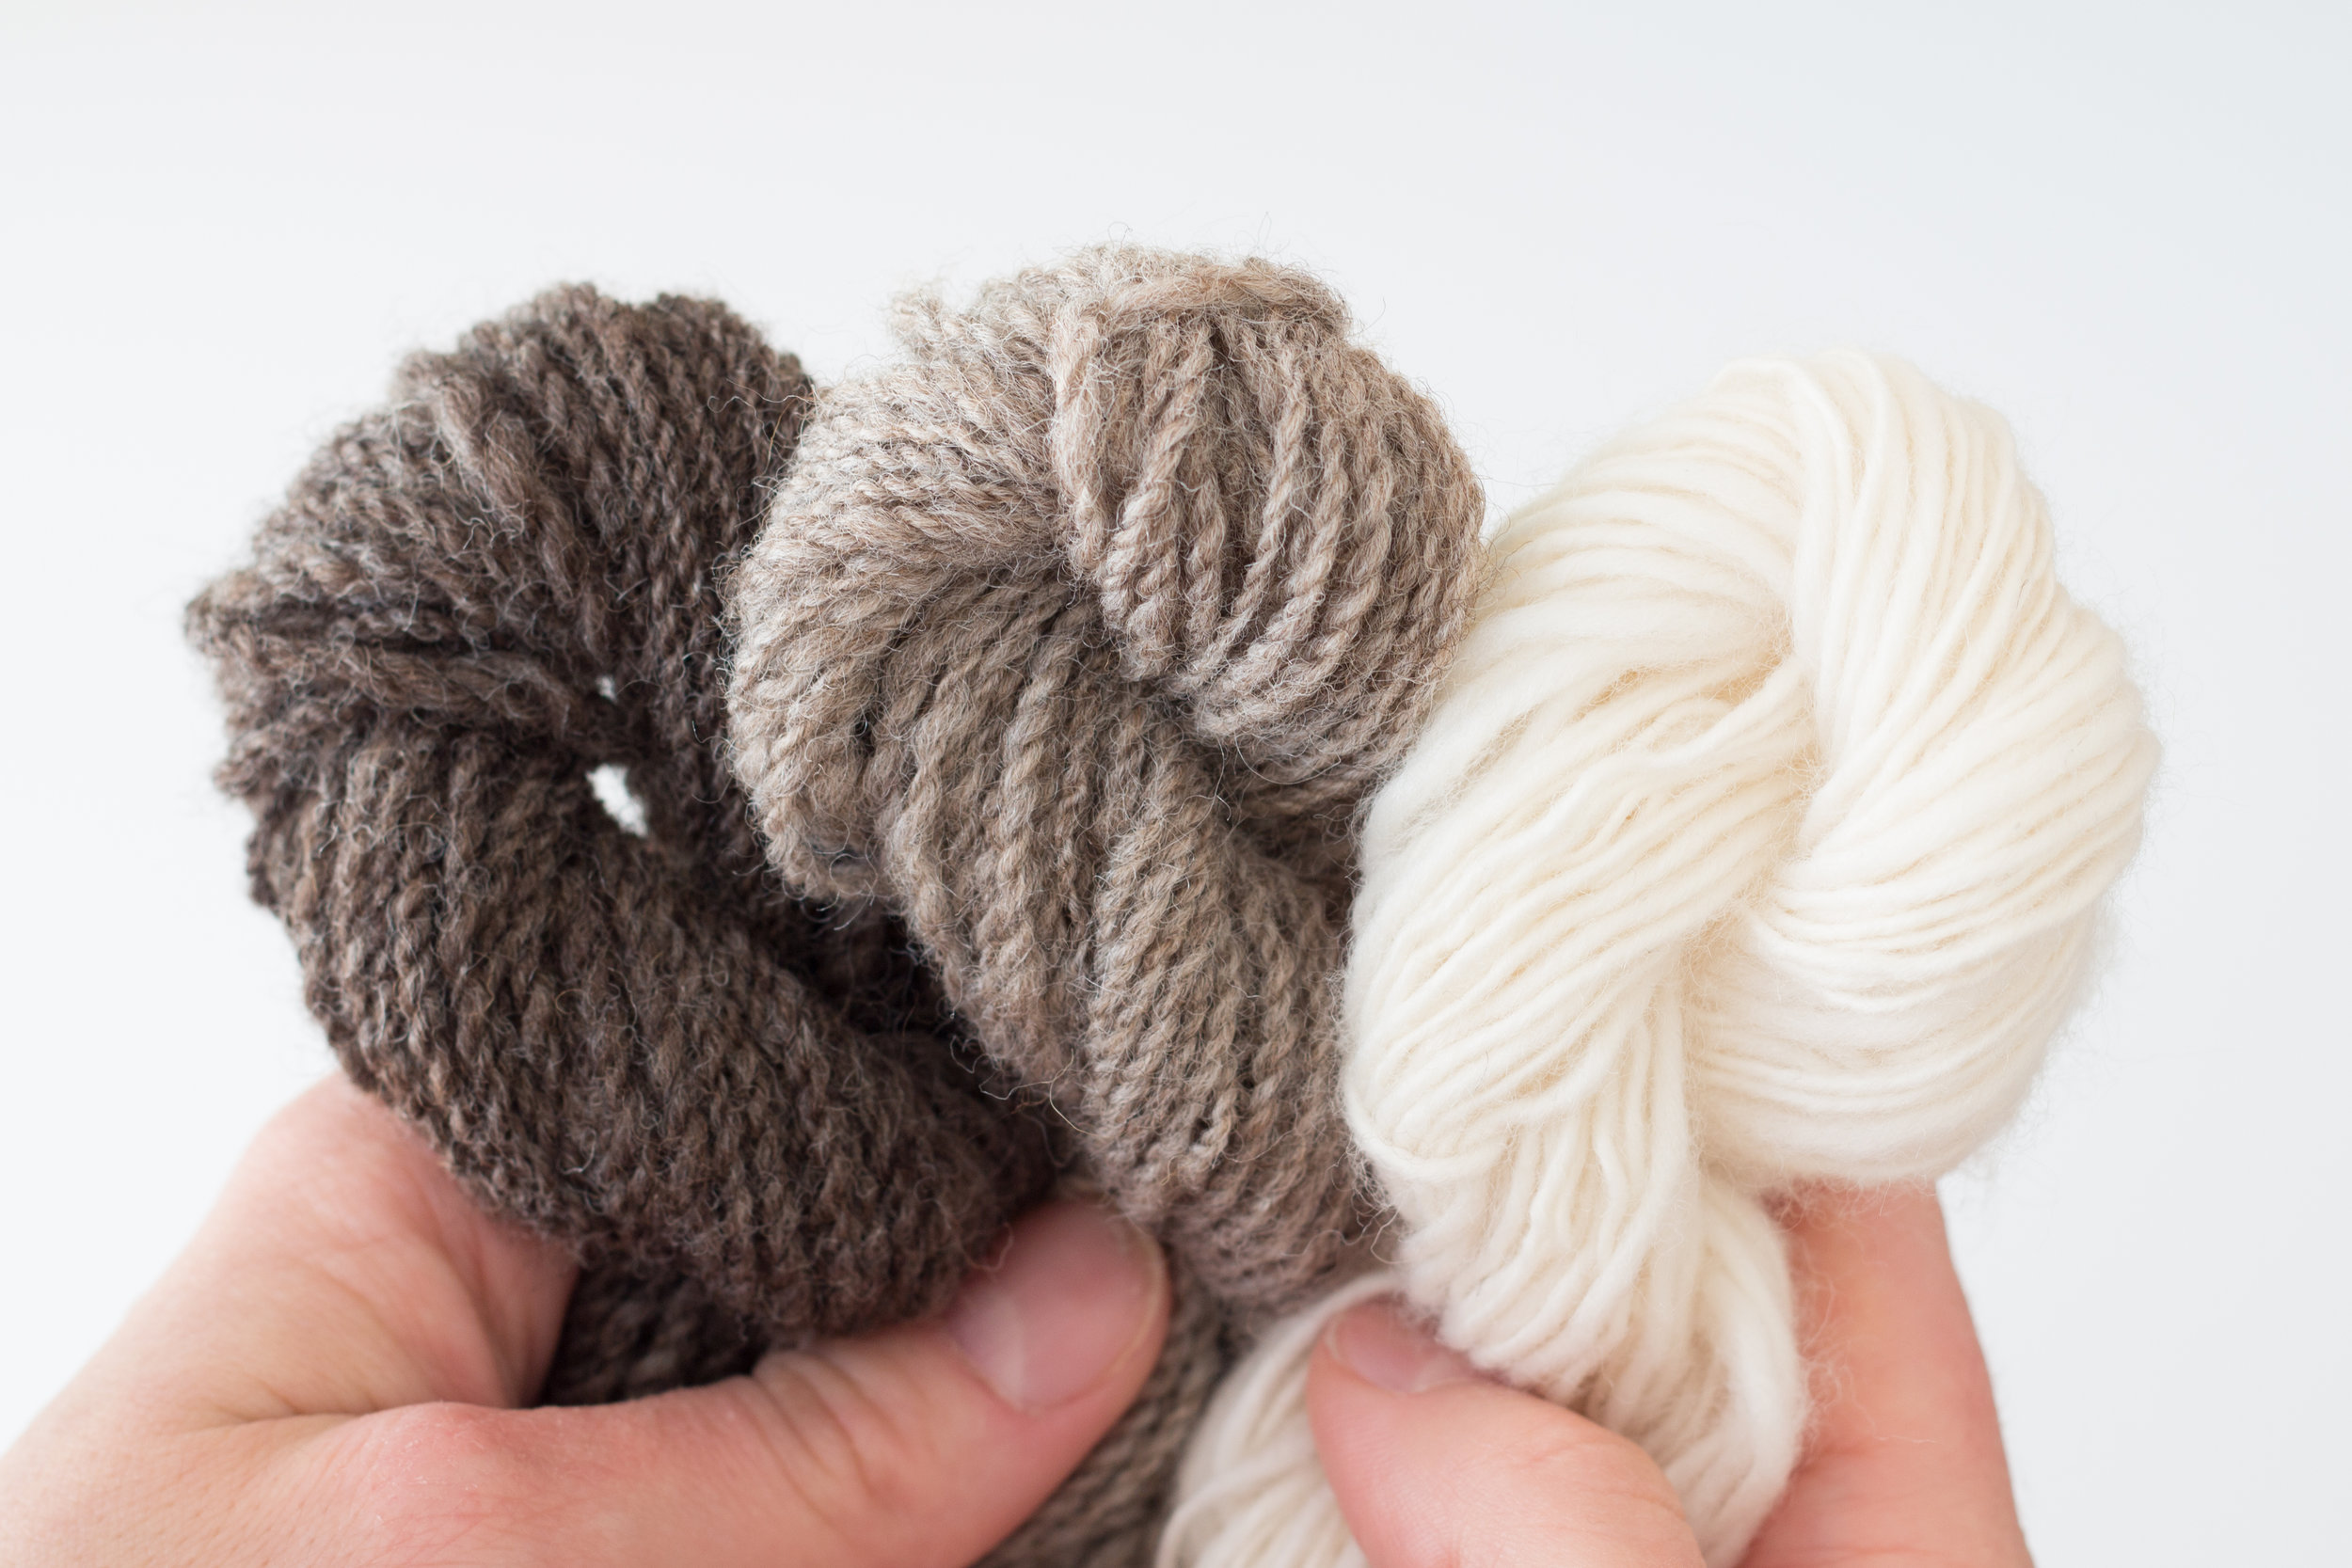
Loch Lomond GOTS by BC Garn is a charming 100% wool, tweed style yarn with Global Organic Textile Standard (GOTS) certification.
Minimally processed, this woollen spun yarn has lightness and loft making it soft, springy and warm.
Available in a range of delicately heathered shades made possible by ‘dyeing in the wool’, where the wool fibres are dyed prior to spinning, bringing life to the palette.
With its GOTS certification, this yarn meets strict ecological and social criteria to ensure the entire supply chain meets the leading worldwide standard for organic textile production.
All in which make this yarn perfectly suited to a range of rustic and warming handknits and woven pieces that will see you through the coldest days.
Colour A, Moss

BC Garn
Loch Lomond GOTS by BC Garn is a charming 100% wool, tweed style yarn with Global Organic Textile Standard (GOTS) certification.
Minimally processed, this woollen spun yarn has lightness and loft making it soft, springy and warm.
Available in a range of delicately heathered shades made possible by ‘dyeing in the wool’, where the wool fibres are dyed prior to spinning, bringing life to the palette.
With its GOTS certification, this yarn meets strict ecological and social criteria to ensure the entire supply chain meets the leading worldwide standard for organic textile production.
All in which make this yarn perfectly suited to a range of rustic and warming handknits and woven pieces that will see you through the coldest days.
Colour B, Beige

BC Garn
Loch Lomond GOTS by BC Garn is a charming 100% wool, tweed style yarn with Global Organic Textile Standard (GOTS) certification.
Minimally processed, this woollen spun yarn has lightness and loft making it soft, springy and warm.
Available in a range of delicately heathered shades made possible by ‘dyeing in the wool’, where the wool fibres are dyed prior to spinning, bringing life to the palette.
With its GOTS certification, this yarn meets strict ecological and social criteria to ensure the entire supply chain meets the leading worldwide standard for organic textile production.
All in which make this yarn perfectly suited to a range of rustic and warming handknits and woven pieces that will see you through the coldest days.
Colour C, Curry


BC Garn
Loch Lomond GOTS by BC Garn is a charming 100% wool, tweed style yarn with Global Organic Textile Standard (GOTS) certification.
Minimally processed, this woollen spun yarn has lightness and loft making it soft, springy and warm.
Available in a range of delicately heathered shades made possible by ‘dyeing in the wool’, where the wool fibres are dyed prior to spinning, bringing life to the palette.
With its GOTS certification, this yarn meets strict ecological and social criteria to ensure the entire supply chain meets the leading worldwide standard for organic textile production.
All in which make this yarn perfectly suited to a range of rustic and warming handknits and woven pieces that will see you through the coldest days.
Colour D, Fire Red
PATTERN
The swatch is for The Throwback sweater pattern published by Andrea Mowry of Drea Renee Knits. This pattern is available for purchase on Ravelry or at dreareneeknits.com.
The pattern provides a gauge of 18.5 stitches and 26 rows over 10cm (4'').

PROCESS
THE DESIGN
Casting on 38 stitches, we started with a base of 4x4 rib running into stocking stitch to test Loch Lomond GOTS in the knitted fabric.
The colourwork chart was incorporated to explore the relationship between the yoke detail and chosen colour palette.

THE SWATCH
We tried a few different needle sizes on some pre-swatch swatches. We found a satisfactory fabric was obtained on 4mm (US 6) needles, with a resulting 5 stitches per inch pre-blocking.
For the colourwork component we began by working the two-colour sections with one yarn held in each hand and catching the floats behind the work at regular intervals.
Having had some experience working the yarn from both the left and right hands, this method was quite comfortable for us and we had no trouble working either the knit or purl sides of the fabric.
THE THREE-COLOUR SECTION
Applying our colourwork method to the three-colour sections proved more challenging.
When working with a third yarn (in either hand) we found it difficult to maintain tension, catch floats evenly across the back (particularly on the purl side) and avoid disastrous tangles between the three strands.
After a few attempts at using various stranding techniques and re-organising our yarns we settled on a method that simply removed the problem!
Our solution… working only two colours across the row and slipping the stitch that required the third colour. The row was then worked again, slipping the previously worked stitches and only knitting the stitches required to complete the three-colour sequence.
This simplified working the purl-side, as the colour pattern was already established from working the knit-side and could simply be repeated – purling with two colours across the row, then working the row again with the third.
Given only six rows of the chart are worked in three-colours we found this to be a quick and easy solution.
FINISHING
The swatch was soaked in a bath of cool water for around 5 minutes, the excess water pressed out using a towel. The swatch was pinned out on a blocking matt, attention given to aligning the stitches and smoothing out the colourwork.
The final measurements:
Overall dimensions, 18cm x 20cm (7'' x 8'')
Gauge, 20 stitches and 24 rows over 10cm (4'')
INSIGHTS AND OPPORTUNITIES
GAUGE
Though we didn’t quite reach the pattern’s gauge, our measurements indicate that this yarn would be a viable option for The Throwback. A quick calculation tells us that we would only need to go up one size to accommodate the variance.
Here’s what we did (using inches for simplicity):
Our size - Size 3, Bust 43''
Our gauge - 5 stitches over 1''
Number of stitches required for our size:
43 (bust size) * 5 (our gauge) = 215 stitches (around the bust)
At Size 3 (bust 43'') and the pattern gauge of 4.6 stitches over 1'', we would have too few stitches:
43 (bust size) * 4.6 (pattern gauge) = 198 stitches (around the bust)
198 (no. stitches at Size 3) / 5 (our gauge) = 39.6'' Bust
At Size 4 (bust 47'') and a pattern gauge of 4.6 stitches over 1'', we get a close match:
47 (bust size) * 4.6 (pattern gauge) = 216 stitches (around the bust)
216 (no. stitches at Size 4) / 5 (our gauge) = 43.2''
Therefore, our corresponding size with the required stitch count is Size 4!
FABRIC
Loch Lomond GOTS bloomed to produce a smooth and homogenous fabric with well-defined colourwork detail.
The woolly texture and tweedy appearance make for a wonderfully rustic hand-feel that is both light and warm to the touch.
FINAL THOUGHTS
This little swatch was an experiment that quickly became a great lesson in working three-colour colourwork.
The colourwork method we used was particularly suited to this project given the piece is worked flat with the three colour sections only occurring over six rows.
Ultimately, giving ourselves the space to explore and experiment via swatching took away any initial apprehension we had and gave us the confidence to tackle the larger project in the future.

THANK YOU FOR READING!
Would you like to save this swatch for later?
Add this swatch to your Ravelry favourites HERE.