Weaving on Your Frame Loom – And The Most Common Problem And How To Fix It

In this post I’ll explore some basic weaving techniques that will help get your first weaving project started. I also have some tips on how to prevent one of the most common problems that all new weavers will experience.

Getting Started With Plain Weave

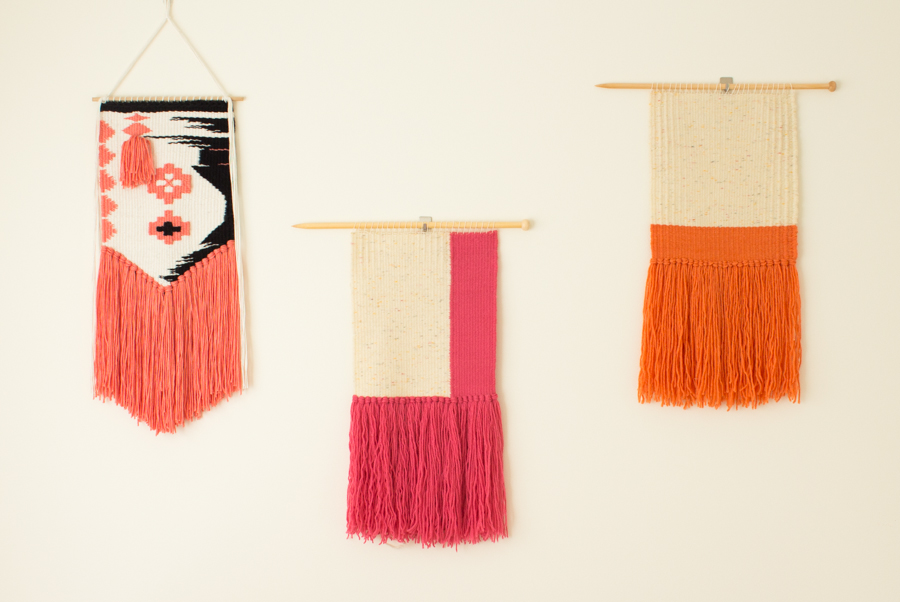
Plain weave, also referred to as tabby weave or tabbing, is one of the oldest and most basic weaving techniques. You'll find that it forms the basis of most projects and through incorporating colour and texture the design possibilities of plain weave are endless. Here are a few examples of wall hangings that use plain weave as their foundation.

Woven Wall Hangings

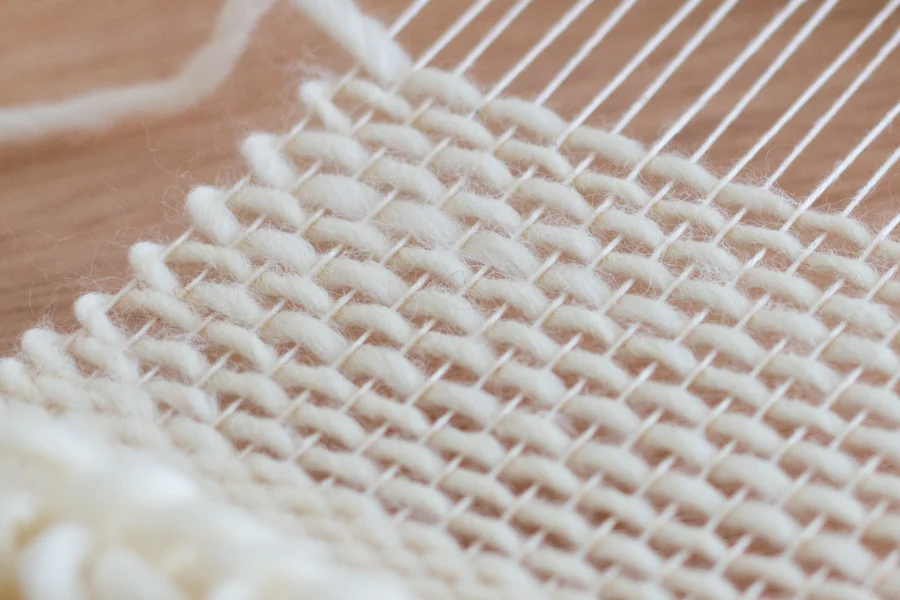
Plain weave is formed by passing a thread, referred to as the weft, horizontally over and under alternating warp threads. As you repeat this pattern over every row a strong woven fabric is formed.

Weaving close-up

There are several methods for conveniently carrying your weft yarn across the warp. The simplest method is to tie your yarn into a butterfly bobbin (shown below) and lift warp threads by hand as you pass the bobbin across the fabric. A large blunt tapestry needle is also useful when working on small or detailed areas as it allows you to quickly pass the needle over and under warp threads. More specialised tools include tapestry bobbins, shuttles and weaving sticks. I'll cover weaving tools in more detail in a future post.

Butterfly Bobbin

Getting the Weft Right

As you begin weaving you might find that the selvage, or edge of the fabric, has a tendency to draw in and tighten. It’s a common problem that many weavers experience and is generally caused by the weft thread being pulled to tightly across the warp. The problem is easily remedied with a few simple techniques and a bit of practice.

The photos below illustrate different techniques for passing the weft across the fabric:

Slanting

Slanting the Weft

Arching

Arching the Weft

Bubbling

Bubbling the Weft

Once you’ve made your slant, arch or bubble proceed by carefully beating the weft into place with your fingers or a weaving comb.

Weaving - Loom and Spindle

With a bit of practice and a little bit of patience you’ll have straight salvages in no time. If your slanting, arching or bubbling results in to much ease and the salvage loops are a bit bubbly you can carefully pull the threads back in place from behind the work.

Assembling Your Frame Loom

This guide will show you how to put your new Loom & Spindle frame loom together.

The Loom & Spindle frame loom consists of four pieces, two flat sided pieces that form the side arms and two pieces with ‘teeth’ that form the horizontal warping bars. Each piece has a notch in each end to hold the frame together.

Weaving Loom

Working on a flat surface, lay the pieces out as shown below. Ensure the notches are facing up for the side arms and the notches are facing down for the warping bars. You’ll notice the warping bars also have a saw cut running the length of the bar. Make sure that this saw cut is facing out.

Weaving Loom

Now that you have everything lined and ready to go, complete your loom by locking the warping bars in place as shown in the photo below.

Weaving Loom

That’s it. Your loom's ready for weaving.

Some Important Tips

  • The joins used to lock the loom together will be a tight fit. You’ll need to apply quite firm pressure to lock the arms together.

  • If there’s any flex in your loom it may be a sign that the joins aren’t pushed together all the way. You’ll need to find someone with strong hands to gives the joins an extra bit of compression.

Diagnosis, Weaver Fever. Cure, Get Your Weave On

So you’ve been lusting over all the amazing woven wall hangings on Instagram? You’re flooding your Pinterest account with weaving inspiration? You see colour and texture everywhere that’s just waiting to woven? Sounds like you’ve got weaver fever and the only cure is to get your weave on. But where do you begin?

Frame Loom Weaving

A simple frame loom is a good way to get started. It’s basic in design and really easy to use. Its core function is to keep all the warp threads (the vertical threads) in order and under tension while you pass another thread, referred to as the weft, horizontally over and under alternating warp threads. Repeat this pattern over every row and before you now it you’re weaving.

There are definitely some skills to learn to get the most out of your frame loom but basically, there are no rules. You have complete freedom to be spontaneous and create something that is uniquely you.

Loom and Spindle Weaving Loom

Choosing Your Frame Loom

Frame looms come in all shapes and sizes and you’ll be sure to find one that suits your style. Give some thought as to where and how you’ll be using your loom, the projects you want to work on and the materials you want to use. A small loom is good for on the spot inspiration and sampling ideas, whereas a large loom can be a lot of fun for making home furnishings or even clothing.

Loom & Spindle Frame Looms

At Loom & Spindle we’ve designed two new frame looms. The first is The Apprentice, a medium sized frame loom that is great if you’re just starting out or exploring the possibilities of frame loom weaving. It’s currently my go to loom for weaving in front of the TV as it fits comfortably on my lap. For those of you who are a bit more ambitious we’ve designed a large 64x64cm frame loom named The Master. Its size makes it great for large wall hangings or working multiple projects at once.


Loom and Spindle Weaving Loom

For more information and the dimensions of our looms please check out the Loom & Spindle Shop.

Stayed tuned for our up coming blog posts - Warping Your Frame Loom and Weaving 101.